


What is an XML Sitemap?
An XML sitemap is a file that lists all the pages on a website. It provides information about each page, such as the last time it was updated and how important it is compared to other pages on the site.
In simpler terms, an XML sitemap acts like a table of contents for your website. It lists the names of all the web pages and their types, along with other essential details.
Having an XML sitemap can improve your site's visibility and ranking. This is because it gives search engine crawlers a clear structure for your website.
You can use XML sitemaps to index and organize the content on your website. With a sitemap, the crawler can quickly find and access all the pages with helpful content on your site.
Why is it Required?
XML Sitemaps help Google and other search engines find your website's helpful pages.
Sometimes, webpages are not internally linked adequately, so they are hard to find, but XML sitemaps allow crawlers to access those pages as well.
Apart from only listing the pages, they also show the importance of web pages compared to each other. For example, the home pages are assigned more importance than pages with ending notes in XML sitemaps.
What Kind of Websites Need it?
The addition of a sitemap solely does not affect search rankings. They are particularly important for websites which have lots of web pages.
Some websites update their pages regularly while others keep adding new ones – in both cases, this leads to an extensive collection of pages.
Thus, some web pages get lost in the crowd. That is why XML site mapping can help get crawlers to access them.
Websites with complex navigation structures can make it difficult for search engine crawlers to discover all the pages on the site.
An XML sitemap can provide a clear list of all the pages, regardless of their location in the navigation structure.
Additionally, if a website has certain pages that are not properly linked from other internal pages, like special landing pages for marketing campaigns, an XML sitemap ensures those isolated pages also get crawled and indexed by search engines.
How Does It Work?
When search engine crawlers visit a website, one of the first things they look for is the XML sitemap. They read this sitemap file to find a list of all the pages on the site, along with extra details about each page.
The main purpose of XML sitemaps is to help search engines navigate and explore your website easily.
Just like how a traveller uses a map to find their way, an XML sitemap acts as a map that allows search engines to locate and crawl all the different pages.
Example of XML Sitemap
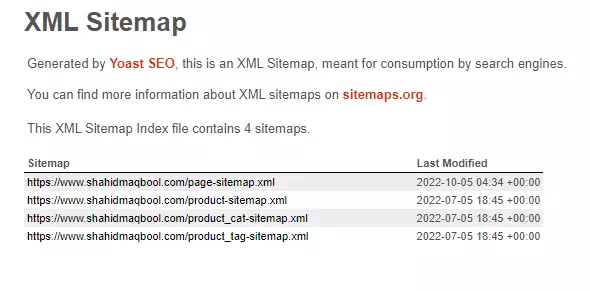
Here is an example of an XML sitemap of the website shahidmaqbool.com.
When you click on this link, you will see a date at the end of each URL. It indicates when the content was last updated. It tells Google that new content is available to crawl and index.
Four rows indicate a separate sitemap. Each sitemap will take you to another list of URLs currently indexed under this particular sitemap.
An XML sitemap has a limitation of 50,000 URLs and a file size limit of 50MB (uncompressed).
If you have a big website with many pages that exceed the limit, you need to break the sitemap into multiple sitemaps.
To do this, you can create a sitemap index file, which is a parent file containing a list of the smaller sitemap files.
In Google Search Console, you have the ability to create up to 500 sitemap index files for each website, as well as additional sitemap files as needed to include all of your site's URLs.
Once you have created and configured these files, you can submit them to Google to ensure crawling.
How Do You Read XML Sitemaps?
There are several components of an XML sitemap. While not all sitemaps display the same information, some of the information is common among all.
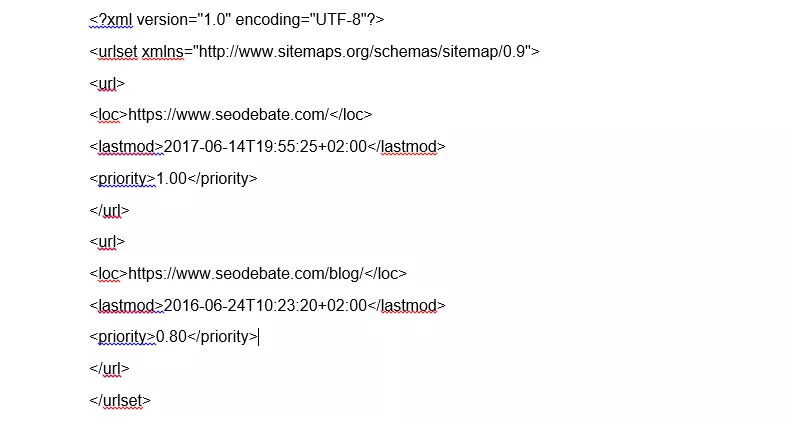
Let us take an example sitemap of the website seodebate.com and read its different components.
Some of the components/tags that you will see on all sitemaps are:
<urlset>
<loc>
<lastmod>
<changefreq>
<priority>
<url>
<urlset>
This tag contains a set of all URLs on a website. It also states which version of the XML sitemap standard is used. The 0.9 standard is used in the below example, supported by major search engines like Google, Yahoo, and Bing.
<url>
The <url> tag is a required element in an XML sitemap and is used to list the URL and additional metadata.
The <url> tag should enclose all the child elements that provide information about a specific page, including the <loc> tag that specifies the URL of the page.
Here's an example of how the <url> tag might be used:
<url>

 <loc>https://seodebate.com/page1</loc>

 <lastmod>2023-02-01</lastmod>

 <changefreq>weekly</changefreq>

 <priority>0.8</priority>

</url>
In this example, the <url> tag lists the URL and additional metadata for a page on the "seodebate.com" called "page1".
The child elements of the <url> tag provide information about when the page was last modified (<lastmod>), how frequently the page changes (<changefreq>), and the priority of the page relative to other pages on the site (<priority>).
It's important to note that each <url> tag should only list the URL and metadata for a single page.
If a site has multiple pages, each page should have its own <url> tag within the larger <urlset> tag that encloses all the URLs.
<loc>
The <loc> tag is a required child element of the <url> tag and is used to specify the URL of a page.
The <loc> tag should contain the full URL - including the protocol and the domain name.
Here's an example of how it looks:
<url>

 <loc>https://seodebate.com/page1</loc>

 <lastmod>2023-02-01</lastmod>

 <changefreq>weekly</changefreq>

 <priority>0.8</priority>

</url>
In this example, the <loc> tag specifies the URL of a page on the "seodebate.com" website called "page1".
When search engines read this, they will use the URL specified in the <loc> tag to crawl and index the page.
It is important to note that the <loc> tag should only contain one URL per tag.
If a page has multiple URLs, each URL should have its own <url> tag with its own <loc> tag specifying the unique URL.
<lastmod>
The <lastmod> tag is an optional child element of the <url> tag and is used to specify the date when a page was last modified. The date should be in ISO 8601 format, which is YYYY-MM-DD.
Here's an example:
<url>

 <loc>https://seodebate.com/page1</loc>

 <lastmod>2023-02-01</lastmod>

 <changefreq>weekly</changefreq>

 <priority>0.8</priority>

</url>
In this example, the <lastmod> tag specifies that the "page1" URL was last modified on February 1st, 2023.
It's important to note that the <lastmod> tag should only be used if the page has been modified since the last time it was crawled by a search engine.
The <lastmod> tag should be omitted if the page has not been modified.

It means that Google may use the <lastmod> tag to determine the last time a page was modified, but only if the date provided is consistent with the actual modification date.
If it is not accurate, Google will rely on other signals to determine the last modification date.
<priority>
This optional tag tells search engines the priority of a URL.
Simply put, it tells the search engines which pages they should prioritise while allocating the crawl budget.
Its value ranges from 0.0 to 1.0, where 0.0 is the lowest priority while 1.0 is the highest.
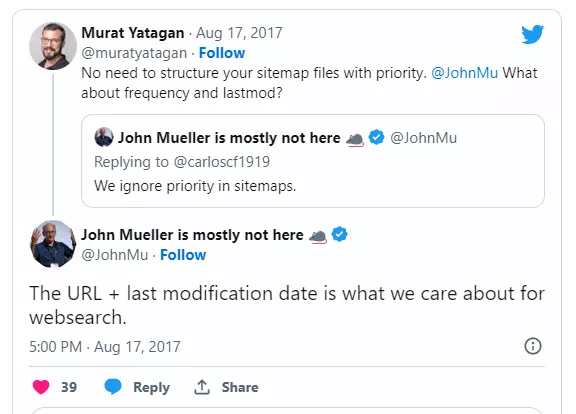
However, according to Gary Illyes (Chief of Sunshine and Happiness at Google), setting a priority level won’t give you an advantage.

<changefreq>
This is an optional child element of the <url> tag which indicates how often content is changed on a website. However, Google says it is obsolete.
<Hreflang>
It is an optional child element used to indicate a page's language and regional targeting.
This tag is used for international SEO purposes to serve the appropriate version of a page to users based on their location and language.
Here is an example:
<url>

 <loc>https://seodebate.com/page1</loc>

 <lastmod>2023-02-01</lastmod>

 <changefreq>weekly</changefreq>

 <priority>0.8</priority>

 <xhtml:link rel="alternate" hreflang="en-us" href="https://seodebate.com/en/page1"/>

 <xhtml:link rel="alternate" hreflang="es-mx" href="https://seodebate.com/es/page1"/>

</url>
In this example, the <hreflang> tag specifies two alternate versions of the "page1" URL, one for English-speaking users in the United States (<xhtml:link rel="alternate" hreflang="en-us" href="https://seodebate.com/en/page1"/>) and one for Spanish-speaking users in Mexico (<xhtml:link rel="alternate" hreflang="es-mx" href="https://seodebate.com/es/page1"/>).
It's important to note that the <hreflang> tag should only be used for pages that have alternate versions. If a page has only one version, it should be omitted.
Additionally, the <hreflang> tag should always be used in conjunction with the rel="alternate" attribute to indicate that the linked URLs are alternate versions of the same page.
Google Priorities on Sitemaps
Here are some key factors that Google utilizes when it comes to sitemaps.
Sitemap size must be limited to 50MB (uncompressed) or 50,000 URLs. If larger, create multiple sitemaps or a sitemap index file to track search performance in the Search Console.
The sitemap must be UTF-8 encoded and hosted anywhere on your site, but for maximum impact, submit it through the Search Console or place it at the site root.
All tag values in XML sitemaps must be entity escaped.
<priority> and <changefreq> values are ignored by Google, and the <lastmod> value is used if it is verifiably accurate, such as by comparing it to the last modification of the page.
How to Create an XML Sitemap?
You can use various online generators or plugins to create an XML sitemap for your website.
Here's a detailed guide on how to create it:
Determine the pages on your website
The first step in creating an XML sitemap is to determine which pages on your website you want to include.
This typically includes pages like your homepage, blog posts, product pages, and other important content.
Choose a tool or method for creating the sitemap
There are several ways to create an XML sitemap. Here are some options:
Online sitemap generators
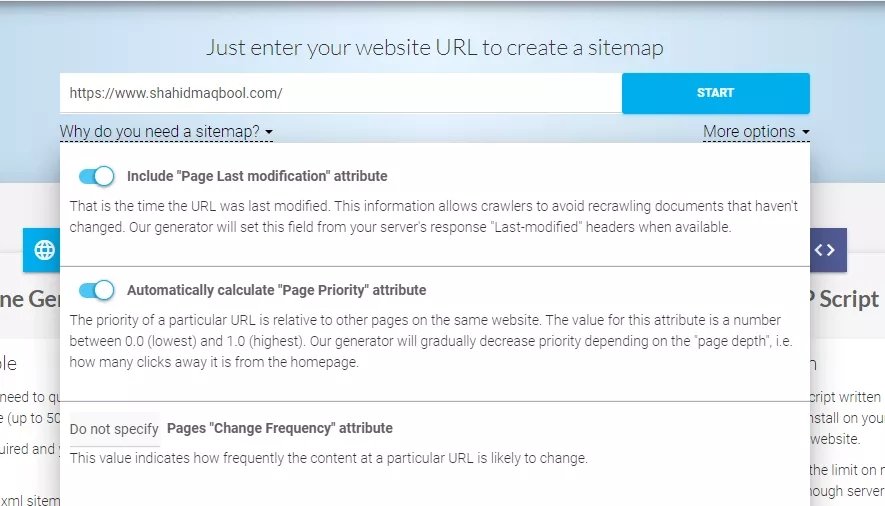
There are many free online tools available that can generate an XML sitemap for you. Let's take the example of “XML Sitemaps generator”.
Go to the “XML Sitemaps” generator in your web browser.
Enter the URL of your website in the provided field.
Choose the optional settings for your sitemap, such as the maximum number of pages to include, change frequency, and priority. You can adjust these settings based on your specific needs.
Click on the "Start" button. The tool will then crawl your website and generate a sitemap file.
Once the sitemap is generated, you can download it by clicking on the "Download your XML Sitemap" button. This will download the sitemap file to your computer.
Upload the downloaded file to the root directory using FTP or any other file transfer method.
Finally, submit the sitemap to search engines like Google, Bing, etc.
Using a crawler
You can also generate a sitemap using a crawler.
Let's take the example of Screaming Frog:
Download and install Screaming Frog SEO Spider on your computer.
Open the tool and enter the URL of your website.
Wait for the tool to crawl your website and gather information.
Once the crawl is complete, click on the "Sitemaps" tab.
Select "XML Sitemap" from the dropdown menu.
Click on the "Create Sitemap" button.
The tool will generate a sitemap. You can view it by clicking on the "View Sitemap" button.
Save the sitemap file to your computer by clicking the "Export" button.
Upload the sitemap file to your website's root directory.
Note: When generating a sitemap, you can choose any name for the sitemap file, but it must have the .xml format. This means that the file extension should be .xml, for example, "sitemap.xml" or "mywebsite.xml".
WordPress plugins
If your website is built on WordPress, there are several plugins that can automatically create an XML sitemap for you. Two popular options are Yoast SEO and All in One SEO Pack.
Let's go through the steps to generate a sitemap using the Yoast SEO plugin:
Install and activate the Yoast SEO plugin on your WordPress website.
In your WordPress dashboard menu, click on "SEO", then select "General".
Click the "Features" tab and scroll down to the "XML sitemaps" option. Make sure the toggle is turned "On".
Click on the "XML Sitemaps" tab in the settings.
Configure the sitemap settings, including which types of posts/pages to include, whether to add images/videos and more.
Click the "See the XML sitemap" button to view your sitemap.
Copy the sitemap URL and submit it to search engines.
Test the sitemap for any errors or issues.
Manual creation
If you prefer to create the sitemap manually, you can use a text editor like Notepad or Sublime Text to create the file.
You will need to follow specific formatting rules and include all the necessary elements.
Creating an XML sitemap manually requires some knowledge of XML and the correct formatting for the sitemap.
Here are the steps to create an XML sitemap manually:
Open a plain text editor like Notepad.
Begin the sitemap by typing <?xml version="1.0" encoding="UTF-8"?> on the first line. This specifies that the file is an XML file and sets the encoding to UTF-8.
Add the <urlset> element, which will enclose all the <url> elements for each page on your site. The <urlset> element should include the xmlns attribute to specify the XML namespace. For example: <urlset xmlns="http://www.sitemaps.org/schemas/sitemap/0.9">.
For each page on your website that you want to include in the sitemap, add <url> element. Each <url> element should include <loc> element with the URL of the page. You can also add optional child elements like <lastmod>, <changefreq>, and <priority>.
Close the <urlset> element by adding </urlset> on the last line of the file.
Save the file with a .xml extension, such as sitemap.xml. You can change the name of the file - like file.xml or name.xml - but the extension must be .xml.
Upload the sitemap to the root directory of your website using FTP or through your website's control panel.
Creating an XML sitemap manually can be time-consuming if you have many pages on your website.
However, it gives you complete control over the content and structure of the sitemap.
Submitting Sitemap
After testing the sitemap, you should submit it to search engines to ensure that they are aware of all the pages on your site.
This can be done through the webmaster tools or by adding the sitemap URL to your robots.txt file.
Once submitted, search engines will crawl and index the pages listed in it.
Submitting Through Google Console
To submit a sitemap in Google Search Console, follow the steps:
Go to the Google Search Console.
If you have multiple websites associated with your account, select the one for which you want to submit the sitemap.
In the left-hand menu, click on "Sitemaps" under the "Index" section.
Click on the "Add/Test Sitemap" button in the top right corner of the page. Enter the URL of your sitemap and click "Submit".
Google will now verify the sitemap and check for any errors or issues. This may take a few minutes or longer, depending on the size of your sitemap.
Once the verification is complete, you can view the status of your sitemap in the "Submitted" section of the Sitemaps report. If there are any errors or warnings, Google will provide details on how to fix them.
Submitting through Bing Webmaster
Sign in to your Bing Webmaster account.
Navigate to your website's dashboard.
Click on the "Sitemaps" option on the left-hand menu.
Click on the "Add Sitemap" button.
Enter the URL of your sitemap in the "Submit a sitemap" field.
Click on the "Submit" button.
Bing Webmaster will now begin crawling your sitemap.
Check the "Status" column to see if your sitemap has been successfully submitted and crawled.
If there are any errors or warnings, click on the sitemap URL to see more details and address any issues.
Once your sitemap has been successfully submitted and crawled, you can monitor its status and view any indexing or crawling issues on the "Sitemaps" page.
Adding Your XML Sitemap to the Robots.Txt File
Adding your sitemap URL to the robots.txt file is another way to inform search engines about your website's pages. Here are the steps:
To access the robots.txt file, you need to log in to your website's server using an FTP program or the file manager in your web hosting control panel.
Locate the robots.txt file, which is usually in the main/root directory of your website. If it doesn't exist, create a new file with that name using a basic text editor.
Inside the robots.txt file, add a line specifying the location of your sitemap.
For example, if your sitemap is at https://example.com/sitemap.xml, add this line: Sitemap: https://example.com/sitemap.xml
Save the updated robots.txt file and upload/replace it in the main directory of your website using FTP or the file manager.
To verify, access the sitemap URL (e.g. https://example.com/sitemap.xml) in your web browser to ensure it's working correctly.
How to Cross-submit Sitemaps For Multiple Sites?
According to Google, you have two options to submit sitemaps for multiple sites:
Single Sitemap for Multiple Websites: You can create one single sitemap file that includes the URLs from all your different websites, even if they are on different domains.
Then submit this combined sitemap or sitemap index file to GSC for indexing.
But make sure you have verified ownership of each website included in the sitemap within GSC.
Individual Sitemaps in a Single Location: Create a separate sitemap for each individual website. Store all these sitemaps together in one single location, like a subdomain or subdirectory.
Then reference each website's specific sitemap in that site's robots.txt file.
FAQs
How many website links can be in one sitemap file?
One sitemap file can have up to 50,000 website links (URLs). But the file size must be under 50MB when not zipped.
It is better to keep sitemap files smaller, with around 5,000 links or less in each file. Smaller sitemaps are easier for search engines to read.
Can you have two sitemaps?
Yes, you can definitely have two or more sitemap files for a single website. It is actually a good practice to split up the sitemaps into multiple files if:
Your website has a very large number of URLs
OR
You can group the URLs into separate categories like product pages, blog posts, images etc.
To have multiple sitemaps, you need a "sitemap index file". This is a master file that lists out and points to all the individual sitemap files.
What is an XML Sitemap Index file?
Each XML sitemap has a limit of 50,000 webpage links. So if your website has more than 50,000 pages, you need to create separate additional sitemap files.
These extra sitemap files can then be grouped together and listed in the XML Sitemap Index file.
The index file essentially bundles up all your sitemap files into one place for search engines. It acts like a table of contents for all the sitemap files on a website.
One website domain is allowed to have up to 500 of these XML Sitemap Index files in total.
How often should you update your sitemap?
You only need to submit your Sitemap once to the search engines. After that, they update automatically when you delete, add, or edit any content on your website. You do not need to submit sitemaps multiple times.
How often does Google read sitemaps?
Google does not provide a specific timeframe for how often it reads sitemaps. The frequency of Google crawling and indexing sitemaps depends on various factors. Typically, Google will crawl and index a sitemap within a few days of submission.
Which pages should you add to your XML sitemap?
All the important pages (homepage, about us, product page, contact us, blogs) must be included in your sitemaps.
On the other hand, you must avoid adding thin, weak, or low-quality pages (Thankyou pages, tag pages) to your sitemaps.
How to locate the sitemap of your website?
If you have created the sitemap of your website manually or by using a tool, you can locate it by using the following URL:
yourdomainname.com/sitemap.xml
Similarly, if you have created the sitemap of your WordPress website by using Yoast, you can locate it by using the following URL:
yourdomainname.com/sitemap_index.xml
Note: sitemap_index.xml shows a sitemap index file containing multiple sitemaps.